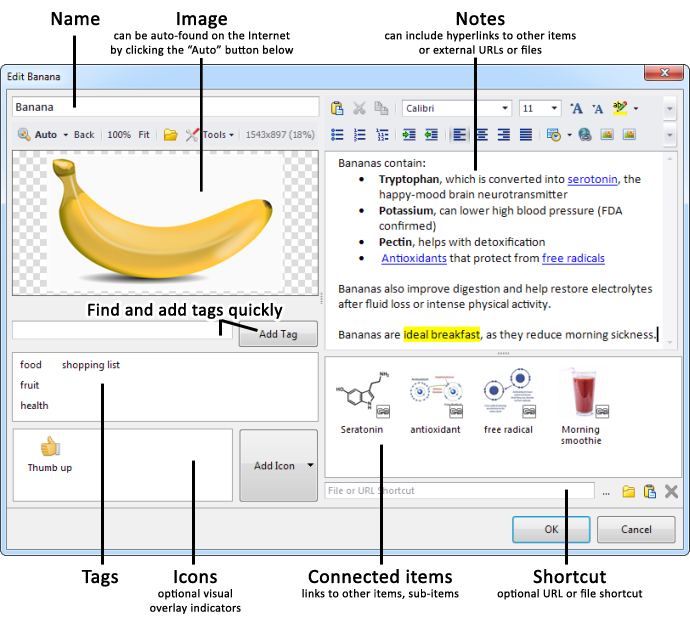
About items and their properties
Items are the main objects in your database. They represent the actual content of your database.
Each item has the following properties:
- Name
- Picture
- Tags
- Icons
- Notes
- Connected items and subitems
- URL or File Shortcut
- (read-only) Date Created li>
- (read-only) Date Changed
All these properties are optional. This mean that you can create items with any or even none of the properties.
When creating your personal visual encyclopedia, the most important and useful properties are name, picture and tags. Adding connected items is also very useful, as is capturing notes for your items.
Icons are entirely optional, and provide visual overlay indicators. You can use them in many ways – get creative. You can also import your own icons.
You can have unlimited number of items in your database.
Viewing images in full size
This is one of the best features you should learn to use –
To view any image in its full size, move your mouse over the image, then click and hold the Middle Mouse Button.
Do not scroll (move) with the middle button wheel, just click and hold it.
Animated explanation of middle mouse button zooming
To view any image in full size, click and hold the middle mouse button
The middle mouse button tricks works everywhere in Mind Collected! It works with images in notes, sub-items, image box in the Add/Edit Item window, and it even works with hyperlinks to items in notes.
Adding items
To add an item, click the first Add button in the main toolbar. You can also press Ctrl + T, or double-click anywhere in empty space in the items area.
Here’s an explanation of the Add Item window. All properties are optional –
Finding and loading images
There are 5 ways of loading images in the Add Item and Edit Item windows. You can:
- Auto-Find the image on the Internet (read more below)
- Paste the image or image file from clipboard, by right-clicking the image area, then clicking Paste
- Drag and Drop any image file into the image box
- Load an image file from your hard drive, by clicking the Tools button, then clicking Browse…
- Capturing the image from part of your screen, by clicking the Tools button, then clicking Screen Capture. This will temporarily hide Mind Collected, and allow you to select any part of your screen to capture.
The auto-find feature searches the Internet, by using Google Images or Bing Images on the background. It searches for the image based on the name of your item.
To auto-find an image, enter the item name first (generic names in English are best), then click the Auto button in the image toolbar. This will display the first image search result. You can then keep clicking the Auto button (now changed to Next button) to browse the search results. The Back button will navigate you to previous image search results.
If you can’t get a good image result, change the item name to something more general and simple, then try again. After finding a satisfactory image, you can change the name back to anything you want.
When an image is found, Mind Collected will also attempt to download the full-resolution version of the image. If successful, a link will appear below the image box. Clicking the link will switch to the full-res version of image.
If the auto-find feature doesn’t work for you, make sure that Mind Collected can access the Internet and no firewall or other security software is obstructing it. Also make sure that you are running the latest version of Mind Collected.
Adding items from files
Instead of using the Add Item window, you can also create items by Dragging and Dropping picture files (JPG, PNG, BMP, GIF, and others) directly into the items area in the main window. You can also Drag and Drop other kinds of files to create shortcut items linking to these files.
It’s possible to create sub-items by Dragging and Dropping picture files into the connected items area.
Editing items
To quickly rename an item in-place, select it, then click on it. Or, select it, then press the F2 key.
To edit an item, double-click on it, or select it and press the Enter key.
Please note: If the item has an associated shortcut, double-clicking or pressing Enter it will execute the shortcut – in that case, you can right-clickEdit… in the popup menu.
Alternatively, simply select the item, then click the Edit button in the main toolbar.
Deleting items
Simply select the items you want to delete, then click the Delete button in the main toolbar, or press the Delete key.
You can also right-click any item and click Delete in the popup menu.
Please note that the deletion can’t be undone and deleted items can’t be recovered.
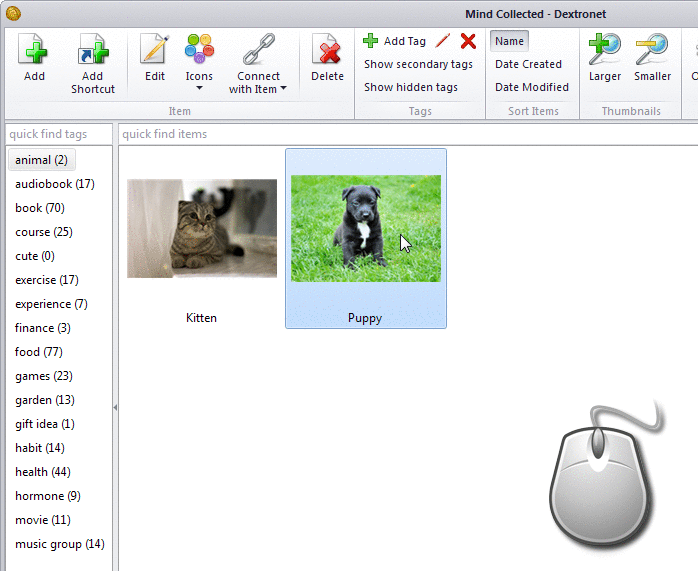
Viewing items
When you select a tag (or multiple tags) in the tags area, only items with any of the selected tags will be displayed in the main items area.
You can then further filter (drill-down) the shown items using the secondary tags area, if the currently shown items have any secondary tags.
To view item’s Date Changed, Date Modified, tags or icons, move your mouse over the item – shortly, tooltip will be shown. Tooltips are also shown for connected items and for item hyperlinks in notes.
Thumbnails
You can adjust the thumbnail size of the shown items using the Larger and Smaller buttons in the main toolbar. You can also use Ctrl + Mouse Wheel, or Ctrl + and Ctrl –.
The maximum viewing thumbnail size is currently 400×400, and minimum 16×16.
Sorting items
By default, the items are sorted alphabetically. You can change the sort using the main toolbar, by clicking Name, Date Created or Date Modified toggles. Clicking any of the toggles (e.g. Name) a second time will switch the sort order from ascending to descending.
It’s currently not possible to re-order items manually. If you are using the Name sort and want a specific item to be displayed always first, you can edit that item, and put a space in front of it’s Name (e.g. ” Item Name”).
Finding items
The fastest way to find any item is to use the quick find items field above the items area in the main window. This field will display item search results as-you-type (or after pressing the Enter key) and will thus allow you to find any item quickly.
To perform full-text search that includes item notes, submit your search text using Ctrl + Enter. When you then click on a search result item that was found based on its notes, the notes area will highlight the found text part. You can also click inside the notes area, and press F3 to cycle search results inside notes of that particular item.
After search is performed, you can right-click any of the found items, and click Go to search result in the popup menu to navigate to the found item and close search results.
To close the search results, you can also simply press the Escape (Esc) key, or click the small close search results button right to the quick find items field.
Shortcut items
Every item in Mind Collected has an optional property named “File or URL Shortcut”.
It can be edited in the Edit Item and Add Item windows, using the field located on the right-bottom side of the Add/Edit Item window.
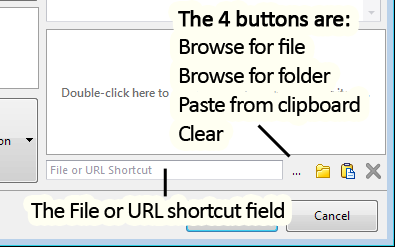
The File or URL Shortcut field in the Edit Item and Add Item windows
When you specify the shortcut of an item, the item will become a “shortcut item”. Its still a regular item, but when you double-click it, then instead of opening the Edit Item window, the shortcut will be launched instead. (You can of course still edit a shortcut item, by simply right-clicking it and selecting Edit in the popup menu.)
When you move mouse over an item that has a shortcut associated, a green arrow overlay symbol will get displayed to inform you that the item is a shortcut.
The following types of shortcuts are supported:
- Files
- Folders
- Internet URLs and other hyperlinks
- Email addresses
- System commands (such as “notepad”, “regedit” – basically, if you can execute something using the Windows Run dialog, you can use it as a shortcut in Mind Collected, too).
Shortcut items can be very useful – you can use them to launch your favorite songs on YouTube, open folders on your hard drives, launch programs or documents, and more.
You can also create shortcut sub-items to effectively attach files, folders or Internet links to any of your items. To create a shortcut sub-item, right-click in the connected items area of an item, then click New file or URL shortcut sub-item…”.